New screens and controls can vary by app edition and your team’s permissions. Examples use sample service data.
SEARCH THE GUIDE
Find your next step
Try a shorter phrase, such as “display”, “Auto” or “Playback”.
Get started
Choose how to get started
Are you running the service or setting up a screen? Start with the option that matches your job.
Steps
Choose Producer sign in to open your existing organization. Use Set up password or Forgot password if you need help signing in.
Choose Set up a display for a screen that will follow your service. Give it a useful name, then get a pairing code.
On a signed-in producer device, open Devices → Pair device to approve that screen.
New to Service Producer?
Public paid signup is not open yet. When it opens, Create an organization will guide you through email verification and the annual subscription. Existing accounts and paired displays keep working.
Which app does what?
Service Producer is where you run the service. Display apps show the content you assign. Connect links your Mac to local equipment and Stream Deck. Playback handles video and its outputs; it is coming soon for general release.
For shared screens
Pair the display instead of sharing a producer password. Keep its pairing in place when updating the app.
Get started
Get ready for your first service
Work through this checklist before the room fills up.
Your pre-service checklist
Check your location, room and time zone in Settings. Connect Planning Center and select the service types you use.
Open Events. Check the service date, start time and runsheet for the room.
Open Devices and check which desk and layout each screen follows. Look at the actual screens too.
Open Producer Desk and choose Take control. Check the live item and timing mode.
If you use video cues or equipment actions, check and test them with your team before the service.
When the service is over, choose End service and confirm.
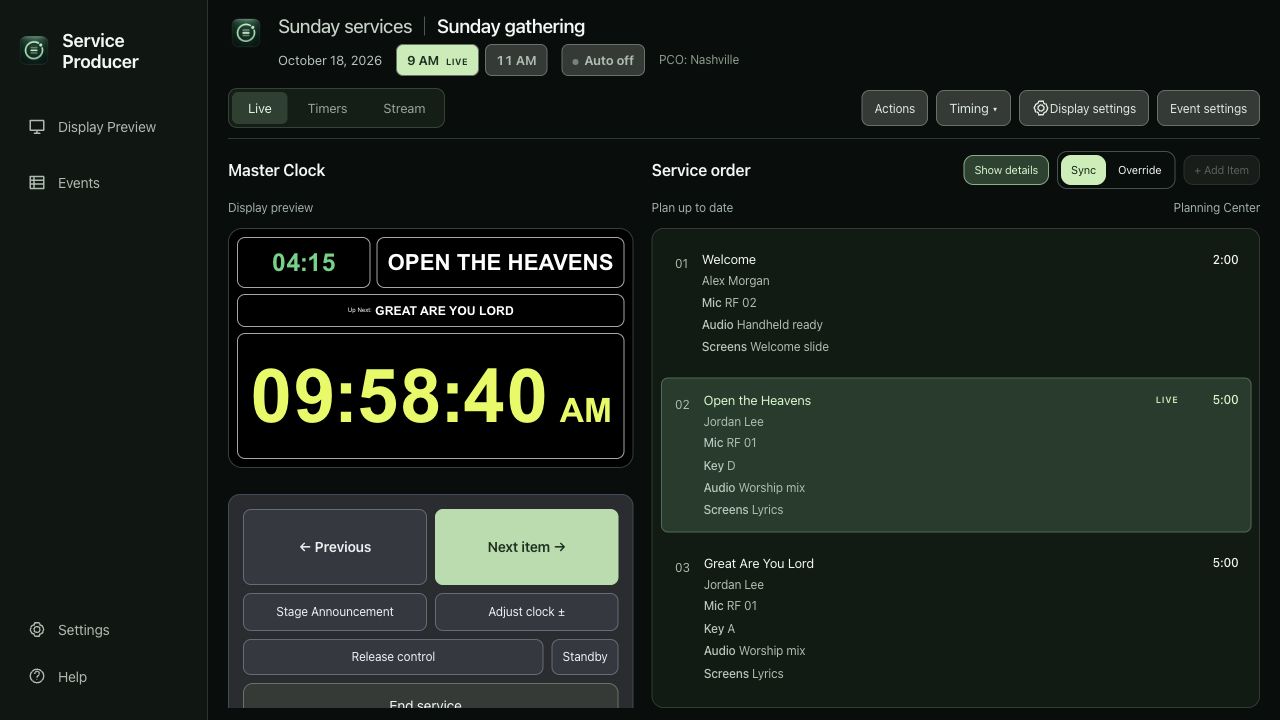
Producer Desk brings the clock, runsheet and service controls together.
Looking ahead
Use Preview to look at another service without changing the one the room is running.
Before you press Go live
Selecting a row only selects it. Go live calls the item and may start its linked video or equipment actions.
Practice before the service
In Events, choose a location and room, then use Test service. Start with the sample or copy a saved service. Take control and use Start, Next and Previous to practice with the room’s connected displays and Stream Deck. The original service stays unchanged, and tests cannot send equipment Actions, Playback or decoder commands. A running service must be ended before a test can take its place. When you finish, choose End service and return to Events to select the scheduled service.
Get started
Set up locations and rooms
Give each independently running service its own room.
Steps
In Settings, add your locations and rooms. Select the Planning Center service types each location uses.
Open Settings → Connections to connect Planning Center.
Use Team access to invite your producers.
Assign each screen and equipment connection to the correct location and room.
One room, one live service
A room has its own Producer Desk. Several screens can follow it. Use another room when a service needs to run independently.
Room limits
New paid plans count active rooms across the organization. Archived rooms do not count. Existing organizations keep their current access.
Before changing a room
Check its screens and equipment actions before archiving, removing or reassigning it.
Get started
Choose the right app
Use Producer Desk to run the service and paired display apps to show it.
Mac desktop
Run Producer Desk, design layouts and use local monitors or supported Blackmagic and NDI outputs. Blackmagic needs compatible hardware and its Desktop Video driver. Configure local outputs in Devices.
NDI availability
NDI output is limited to the Mac desktop app. Its direct installer is intended to include the runtime, but public distribution is pending confirmation. Use the approved download for your build. Other display apps keep their usual pairing workflow.
iPhone and iPad
Use Producer sign in for authorized control or Set up a display to pair a screen. Full-screen mode hides the app controls.
Windows and Raspberry Pi
Install the Windows display app and pair it. For a Pi 4 or 5, follow the supplied image setup guide. Flashing erases the card. Pair each newly flashed display separately; do not clone a paired card. Existing paired displays receive web layout updates without reflashing.
Apple TV and Fire TV
Use the build supplied for your device. Fire TV is a preview, not a published store release. Check the supported model and operating system before installing.
Service Producer Host
Service Producer runs the service and its clocks. Host Producer runs the announcement sequence and presentation. Pair a Host Screen for read-only announcements. These roles have separate control permissions; the Host app is named Service Producer Host.
Web browser
Sign in for Producer Desk, or open a receiver link for a display. Keep a display tab active and its device awake. Configure Mac hardware outputs in the desktop app.
Run a service
Run a service from Producer Desk
See what is live, call the next item, and keep the team together.
Steps
Open the room’s Producer Desk and choose Take control.
Press Next item or Previous to move through the runsheet. To jump to an item, select its row and choose Go live.
Use the service-time controls to switch services. You will be asked to confirm before replacing an active service.
Choose Release control to hand over to another producer.
Choose End service when the service is finished.
Use the runsheet to select an item, then Go live to call it.
Selection is not a cue
Clicking a row or opening Preview does not start it. Taking a linked item live can start its video or enabled equipment actions.
Working with another producer
The Mac app and Stream Deck on that Mac share control through Connect. Another Mac or browser must take control before it can operate the service.
If a command fails
Check which item is live before pressing again. The app and web share the same saved service and display assignments.
Run a service
Let Auto prepare the next service
Auto looks after the room’s schedule. Your timing mode decides how the items advance.
Steps
Select Auto for the room. Check its location, selected Planning Center service types and start times.
In Timing, choose how the service should run. Pre-service → producer follows the pre-service schedule, then gives the producer control at the Service section.
At the end, choose End service. Review any warning about a playing video before confirming.
If useful, set Timers → After the service → Abandoned-session timeout for the room.
What Auto does
Auto works even when Producer Desk is closed. It prepares services from all selected service types for the location, plus events assigned directly to the room. Preparing a service does not take it live.
Protecting a running service
Auto can prepare the next service while one is active, but will not replace the active service. Finish an old session with End service when you are sure it is over.
Pre-service → producer
Before the Service section, items follow the plan’s timing. After that section begins, the producer advances the items. An item can go into overtime while waiting. Reopening the app does not restart its timer.
Optional cleanup for forgotten sessions
Abandoned-session timeout is off by default. You can set 15 minutes to 24 hours. It waits until both the planned end and last producer activity are old enough. A controller, timer override, announcement, Standby, playing video or uncertain Playback status keeps the session open.
Standby is different
Auto-standby can change what screens show after a saved delay. It does not finish the service. Use End service to close it.
Run a service
Update the runsheet
Follow Planning Center, or make changes just for this service.
Steps
Turn on Show details in the runsheet header to see people and production notes.
Use Sync to follow the Planning Center plan. Refresh the plan if a recent change has not appeared.
Choose Override to add or edit manual items. Drag an item’s handle, or use Move Up/Down, to change the order.
To return to Sync, read the confirmation before continuing. The source order returns and manual additions are removed.
Choose the columns your team needs to see.
While a service is running
Reordering keeps the current item and timer running. Do not delete the live item or an item whose timer is still being used. If a manual item is live, call a source item before returning to Sync.
Changes stay here
Override changes Service Producer’s runsheet, not Planning Center. If a plan update removes the running item, review the conflict before continuing.
Useful markers
Cue linked shows that an item has a Playback cue. Action badges show equipment actions. Available columns can include Audio, Screens, Lighting, Notes, Key and BPM.
Run a service
Adjust a countdown
Add time to the current item, or show a separate temporary timer.
Steps
Choose Adjust clock on Producer Desk to add or subtract time from the current item. Use the minute buttons or enter a custom adjustment and choose Apply.
Use Reset only when you want to restart the item’s original duration and clear its adjustments.
For a separate timer, open Timers → Temporary timer override. Enter minutes and seconds as mm:ss, then start it.
Clear the temporary override to return to normal service timing.
A countdown-focused layout keeps the remaining time easy to read.
Which control should I use?
Adjust clock changes the current item’s remaining time. Temporary timer override replaces the displayed countdown temporarily. Neither changes the Planning Center plan.
When you move on
Moving to another item clears the adjustment. Where enabled, a 0:00 item can continue the previous item’s timer.
Reading overtime
A minus sign (−) means the item has run over. For Playback, a dash means remaining time is unavailable; it does not mean the video has finished.
Reusable timing settings
Choose the event mode in Timing. Save settings you use regularly under Settings → Timing profiles.
Run a service
Send a stage announcement
Show a clear message while the service keeps running.
Steps
Take control on Producer Desk and choose Stage Announcement.
Type your message, then show it.
Clear the announcement when the team no longer needs it.
To change how it looks, open Display settings → Stage announcement. Set its position, size, font, colors and heading.
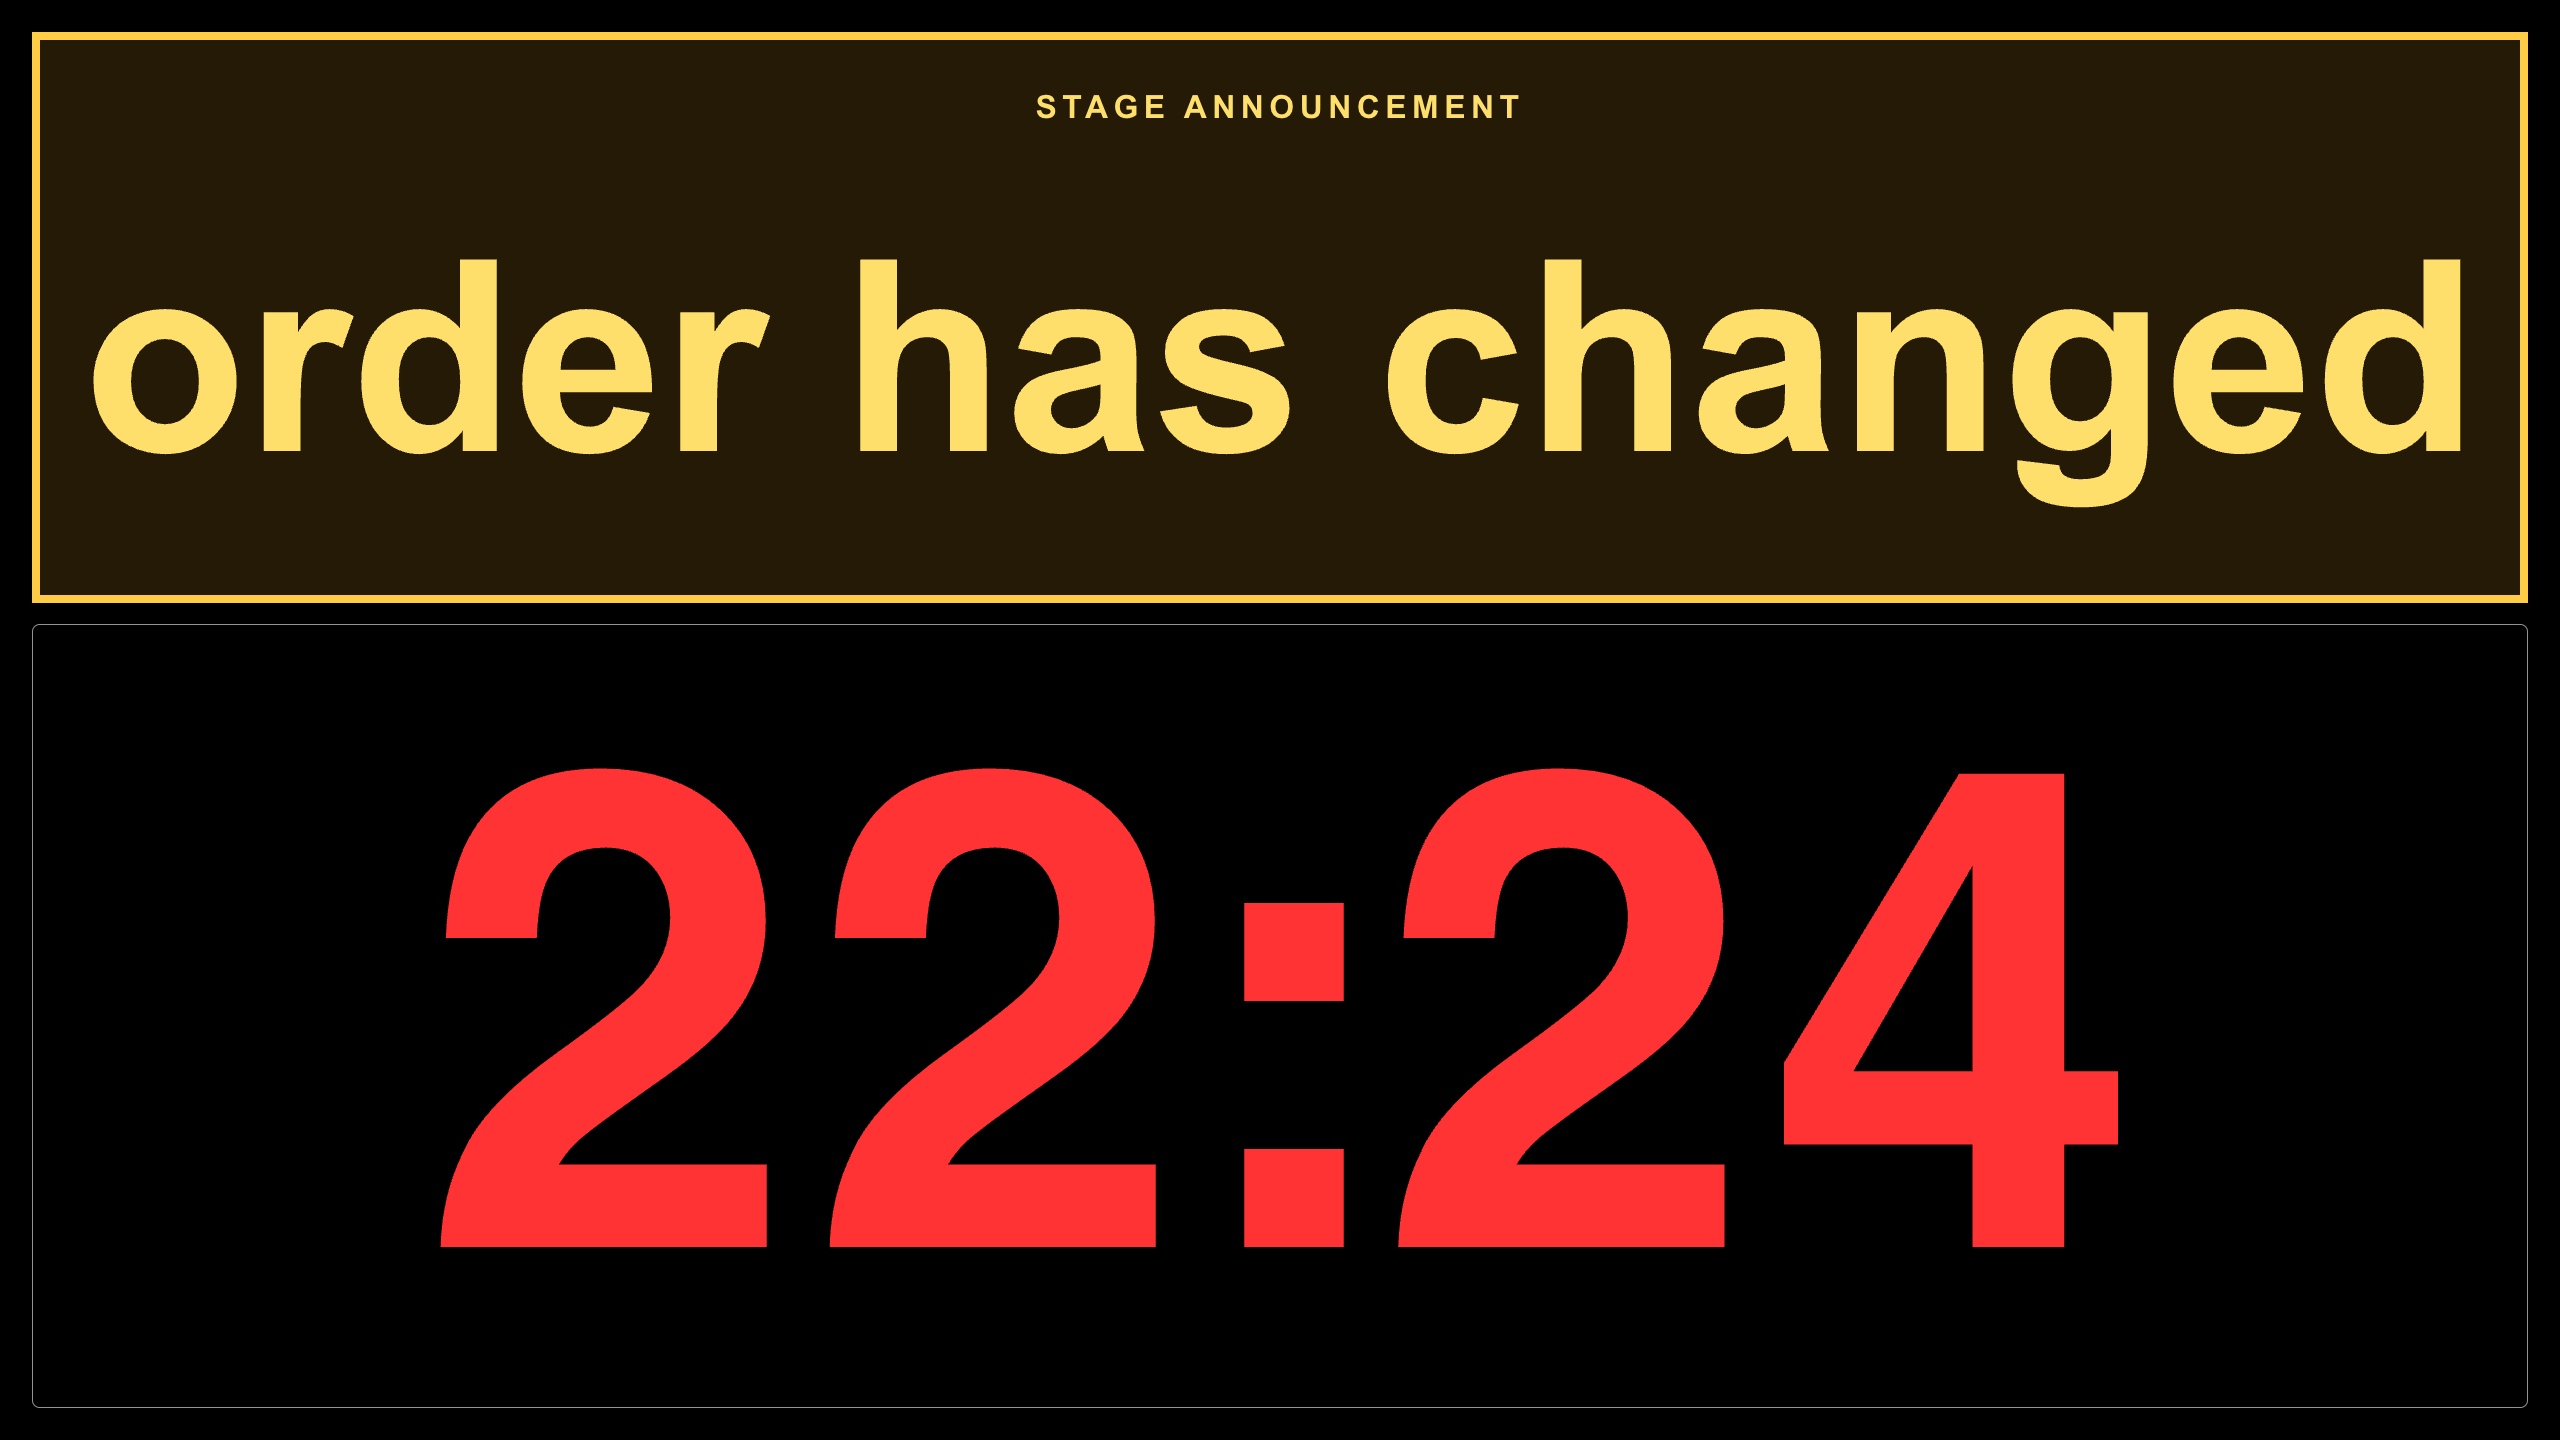
An announcement can share the screen with your countdown.
What keeps running
An announcement does not move the live item or stop its timer.
Run a service
Prepare announcements for your hosts
Choose your hosts’ copy once, then reuse the setup for future services in the same room.
Steps
Open Host Producer and choose Take Host cue control.
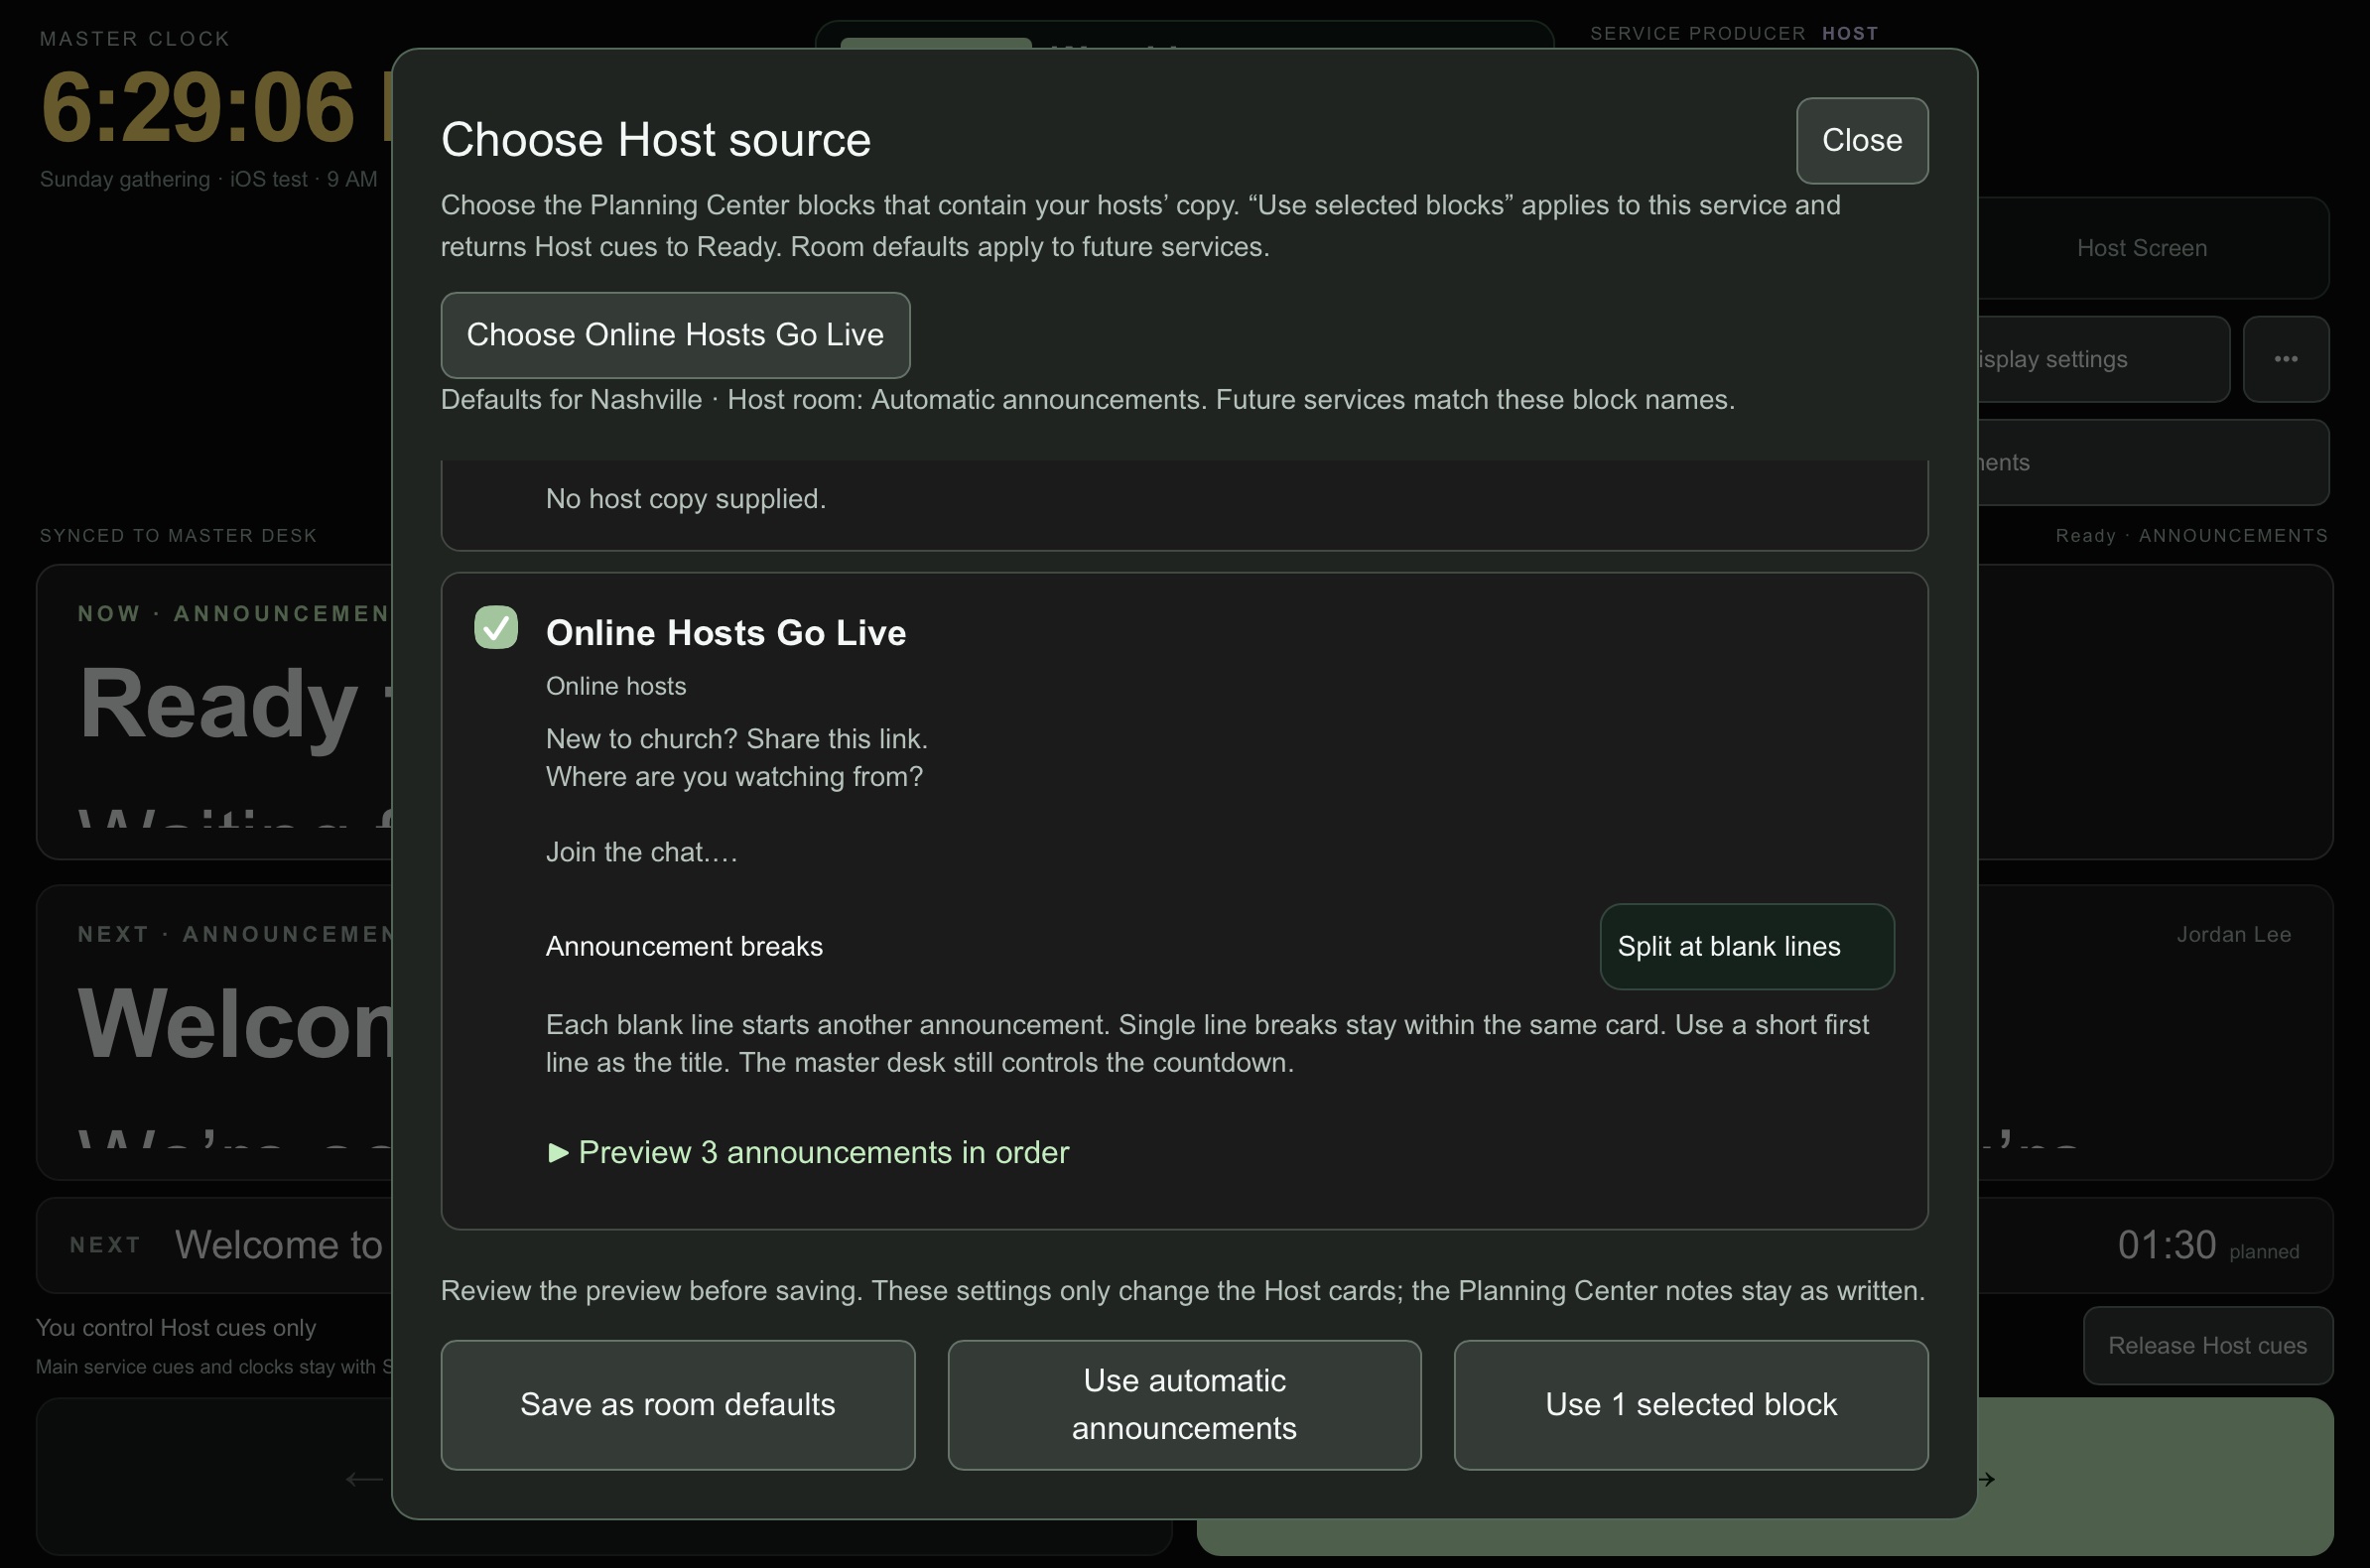
Open Host source. Choose the block containing your hosts’ copy, such as Online Hosts Go Live.
Choose Keep as one script, Split at blank lines or Split at --- separators. Review the announcement preview.
Choose Use selected blocks to apply the source to this service. Host cues return to Ready.
Choose Save as room defaults to remember the source and breaks for future services in this room. You can also save defaults from Display settings.
Choose the hosts’ block and announcement breaks, then save them for future services in this room.
What carries over?
Room defaults include the source block names, announcement breaks, alignment, teleprompter orientation and default text size. New services find the blocks by name, even when Planning Center gives them new item IDs. Each new service starts at Ready.
What stays with this service?
Existing services keep their own settings. You can choose different blocks for a one-off service without changing the room defaults. Saving room defaults does not advance an announcement or change the live service.
If a block cannot be found
If a saved name is missing or appears twice, Host Producer asks you to review the source. Choose the correct block for that service; it will not substitute another announcements block.
Your screen’s text size
Adjust Text size in Display settings. A paired Host screen remembers its own size for this room when you reopen the app. On the web, the size is remembered in that browser. Use default text size returns to the service’s default.
Separate controls
Service Producer controls the main service and its countdown. Host Producer controls the hosts’ announcement cards. A Host Screen follows those cards without cue controls.
Screens & appearance
Connect a display
Pair a screen once, then choose what it follows.
Steps
Open the display app or receiver link. Name the device and get a pairing code.
On a producer device, open Devices → Pair device. Enter or scan the code, then choose its role and Producer Desk.
Choose Configure beside the display. Select the room, screen type and layout.
Check the preview and the physical screen.
For a monitor, Blackmagic output or NDI output attached to your Mac, use Connected to this Mac in the desktop app. Configure it, then choose Start.
Display or controller?
A main service display only shows content. A controller can operate its assigned desk with the access you give it. Host Screen and Host Producer are separate roles.
Local Mac outputs
Use the desktop app to configure hardware connected to the Mac. Closing a settings window does not stop an output; use Stop when you want to stop it.
Keep the screen ready
Keep the app open and the device awake. Connected status confirms communication, so still check the picture. A disconnected screen may retain its last picture and estimated timing.
Keep the pairing
Avoid clearing app data when troubleshooting. To intentionally unpair, revoke the device in Devices or use Forget on the device.
Screens & appearance
Choose what your screen shows
Pick the view that gives each team the information they need.
Steps
Open Devices and choose Configure beside the screen.
Choose its screen type and layout, then save.
Check that the actual screen shows the view you intended.
Master Clock
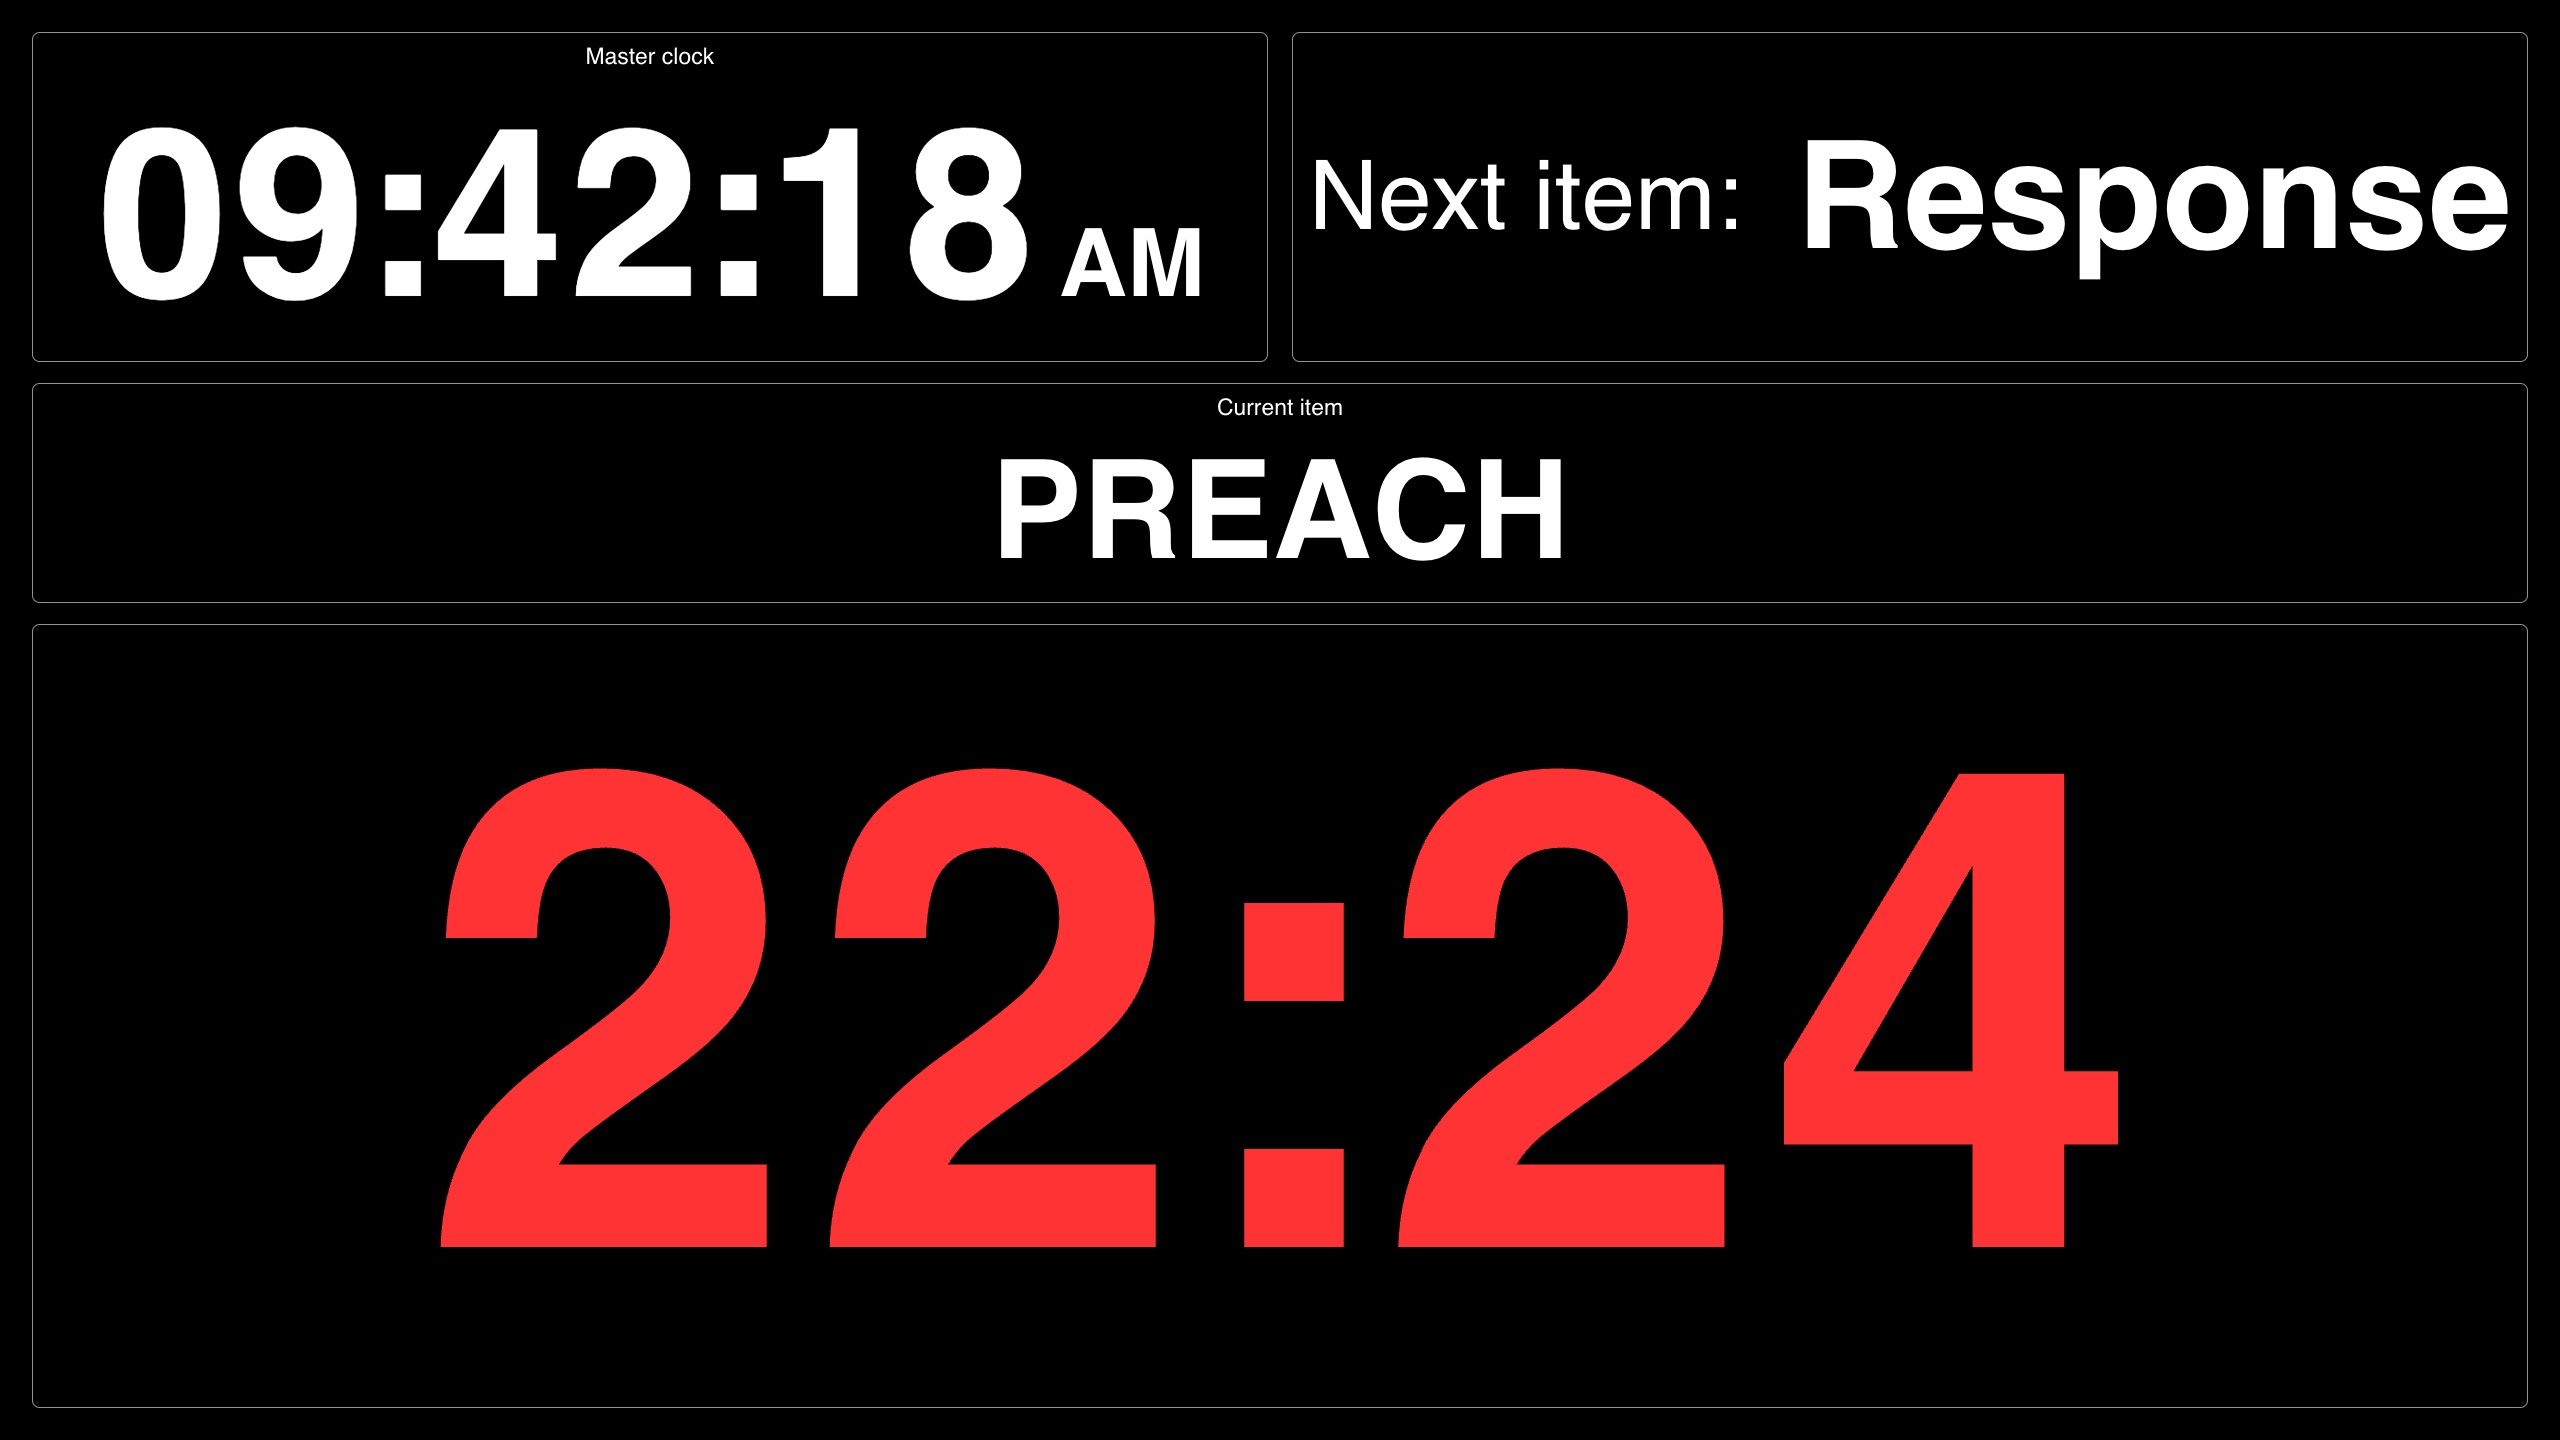
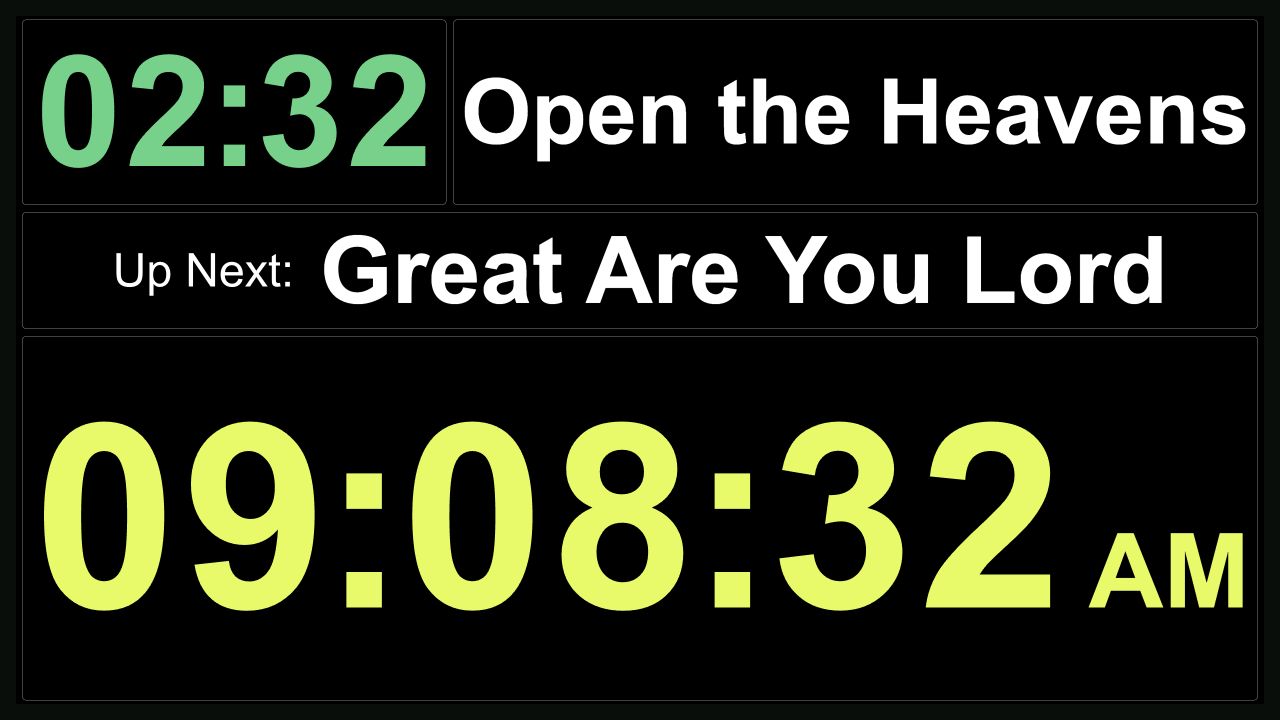
Show the time of day, countdown, current item and next item. Arrange them in the display editor.
Master Clock
Current focus
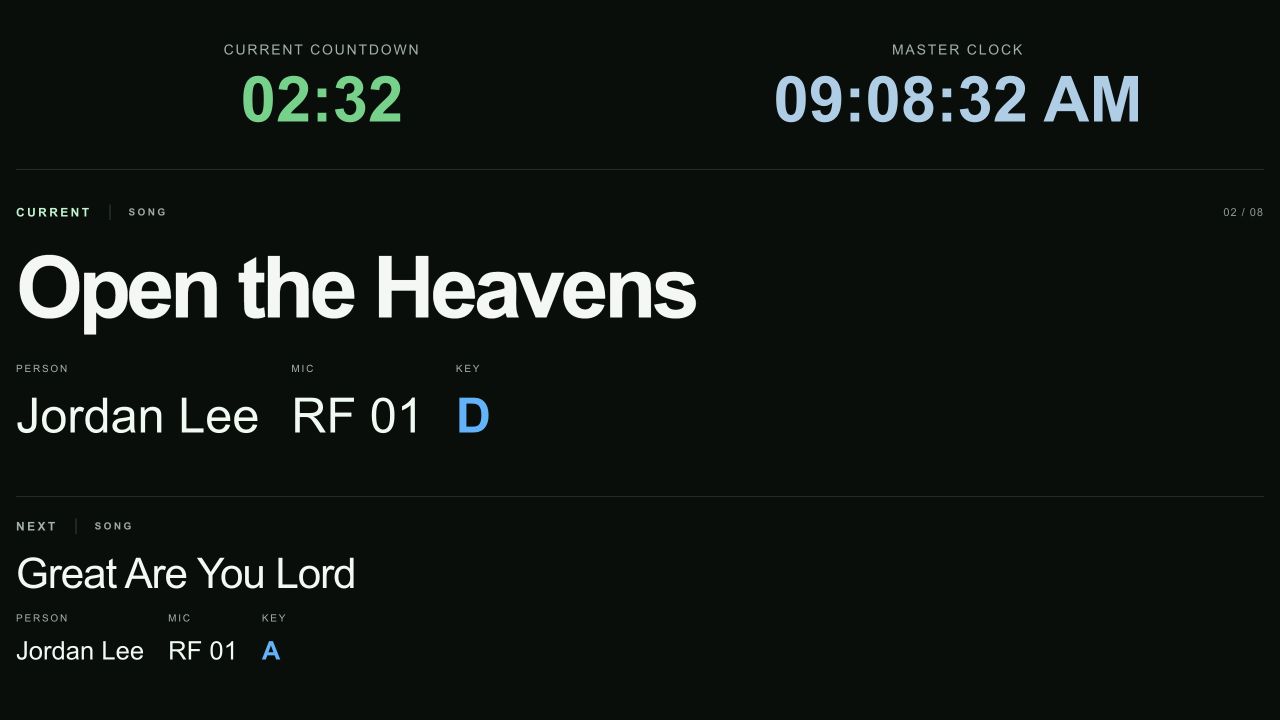
Keep attention on the current and next items, with useful details such as the featured person, microphone and song key.
Current focus
Flow
Show a readable service flow with descriptions and team notes.
Flow
Runsheet
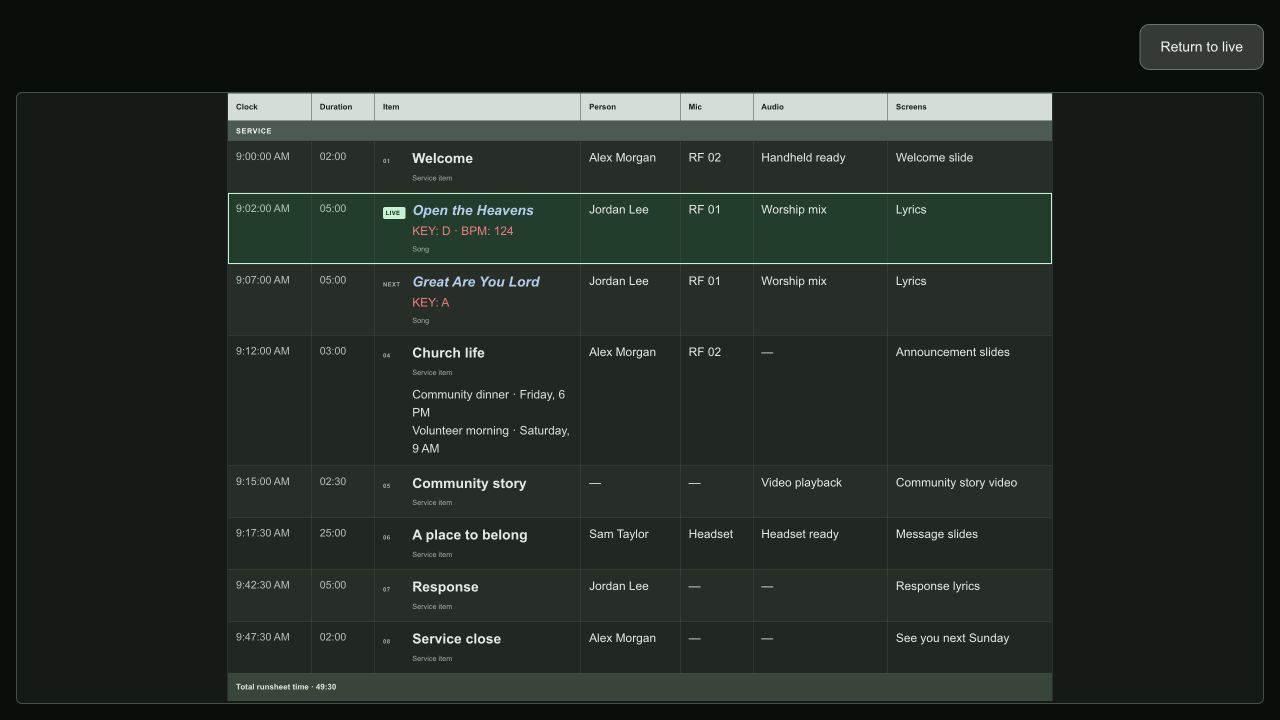
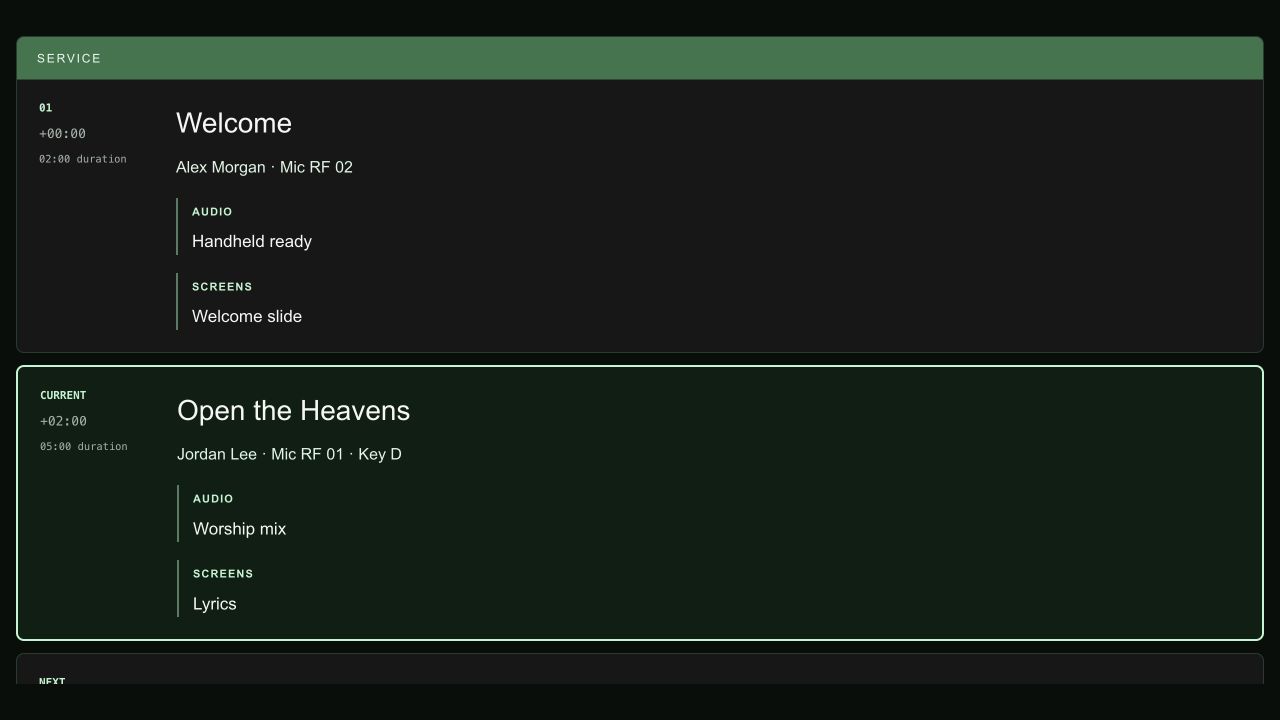
Show the complete order with times, durations and the production columns your team uses.
Runsheet
Screens & appearance
Design a clock layout
Arrange the clock to suit your team, then reuse the design.
Steps
Open Display settings on Producer Desk, or Configure a display and edit its appearance.
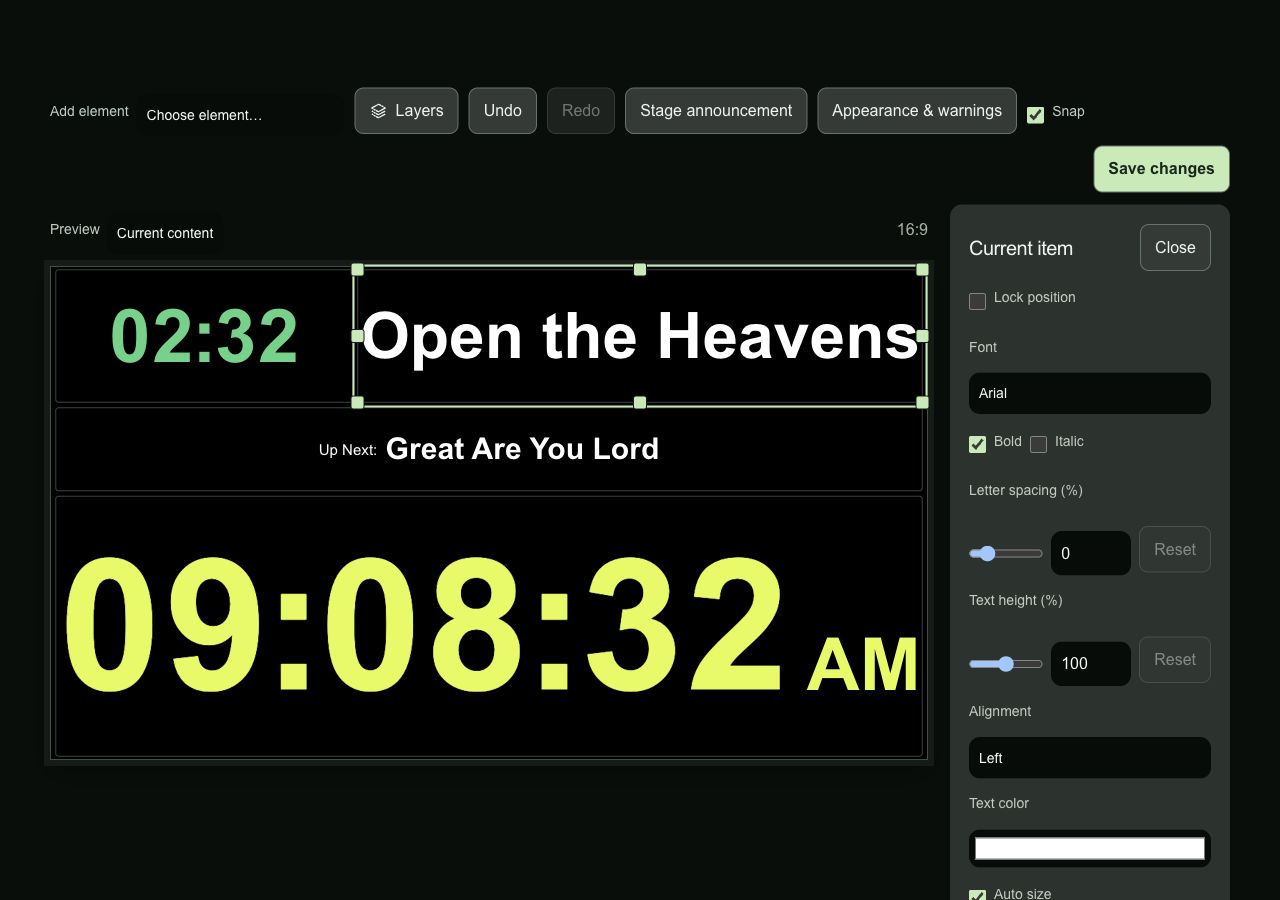
Use Add element to add a clock, countdown, current or next item, text, line or runsheet field. Select an element directly or through Layers.
Drag the element to move it. Drag its handles to resize it. Use the inspector on the right to fine-tune its position and style.
To reuse a box for different information, right-click it and choose Change field, or use Change field in the inspector. Its position and styling stay in place.
Choose Save changes to update the layout, or Save as new preset to keep a separate version. Assign the saved layout to your displays.
Select a box to change its content, position and appearance.
You can edit while displays run
The editor lets you work while the output continues. Saved changes reach displays using that layout. Cancel discards the draft.
Make it your own
Choose the font, size, spacing, text height and alignment. Appearance controls let you change backgrounds, opacity, borders and lines.
Room defaults
Set as room default makes this design the room’s starting layout. A display with its own selected layout or appearance settings may look different; check Configure.
Text that fits
Auto size fills the available box. A manual text size sets the maximum; oversized text shrinks to fit. Check long titles and AM/PM on the actual screen.
Fonts on other devices
Helvetica Bold and SF Pro use installed fonts; they are not included with the app. If a display does not have the font, it uses a fallback. Check the font warning and the actual screen.
Connections
Keep local connections ready
Connect looks after Playback, Stream Deck, equipment actions and network time.
Steps
Install Connect on the Mac you will use for local connections. Enable Start at login and approve the macOS Login Items prompt if needed.
Check the organization and room before setting up a connection.
Keep Connect running and the Mac awake. You can close the settings window without quitting Connect.
Use a network time server
In Timing, choose the location and Network time server, enter the primary and backup servers, then save. Use Use Connect on this Mac. From the web, choose Set up in Connect and open the downloaded configuration on that Mac.
Moving from the old timing helper
Choose Move timing to Connect. Wait for Synced before stopping the old helper. Your saved servers stay in place, and you no longer need the separate timing-helper app.
If the time server is unavailable
Displays show the lost connection and use the saved fallback settings. Network time keeps clocks aligned; it does not synchronize individual video frames.
Saved connections
Automatic reconnection does not arm Playback or repeat old equipment commands. Keep downloaded connection files private.
Keychain prompts
Approve access to saved credentials in macOS. If prompts keep returning, contact support instead of deleting pairings or sharing your password.
Install the Service Producer plugin in Elgato Stream Deck. Start with the supplied profile or add actions to your own layout.
Set up Stream Deck in Connect for the intended room. Open the same Producer Desk in the Mac app.
Take control from either interface.
Select a button in Stream Deck to change its title, text size, colors or action. Clock adjustments can use seconds or minutes.
Export your profile if you want a backup before changing computers or reinstalling.
Keep both apps running
Stream Deck uses Connect and the native Service Producer app. Another Mac or browser has its own producer control.
Dimmed buttons
Action buttons dim when this Mac does not have control. Take control remains available, and remaining time stays readable. Standby limits the available controls.
Reset is not add time
Reset restarts the original item countdown and clears its adjustments, just like Producer Desk.
No device found?
Check the USB connection and whether another app is using the Stream Deck before changing your Service Producer pairing. Button settings save automatically in Stream Deck.
Connections
Link and play a video cue
Use a runsheet item to start a cue in Playback. Playback is coming soon for general release.
Steps
Open Connect and check the organization and room.
In Playback’s Service Producer connection settings, pair with Connect using its invitation. Allow transport controls so Producer Desk can start and stop cues.
Open the right Playback Event and check the cue’s media. Arm the outputs in Playback when you are ready.
On Producer Desk, open Playback → Link a cue. Choose the runsheet item and cue, then save.
Check Playback App, Outputs, Playback Event and Cues on the desk. Go live or Next item starts the linked cue.
Connected is only the first check
Playback also needs the right Event open, ready media, transport permission and armed outputs. Selecting or previewing an item does not play it.
Reconnect automatically
You can reconnect at launch and still leave outputs disarmed. Keep Connect running and both Macs awake; Connect can reach Playback on this Mac or another Mac on the network.
Change a link
Use Unlink in the Playback dialog, including links under another service. Then choose the new service, item and cue. Unlinking restores the planned item duration and does not delete the media.
Leaving a playing video
Complete the fade-out or interruption confirmation when moving on. If the request fails or the result is unclear, check Playback before trying again.
Countdown and audio
After Playback confirms a cue has started, the countdown follows its remaining time. Pausing holds the countdown. Missing timing is shown as unavailable. Set the audio device, channels, level and delay in Playback; Service Producer does not receive its audio stream.
Connections
Add equipment actions
Let a runsheet item send a command to equipment in its room.
Steps
In Connect → Device connections, add a destination for the correct location and room. Choose Q-SYS, OSC, Shelly or TP-Link Kasa and enter its address.
For Q-SYS, read the available devices and functions, then select a control exposed by the Core. For Shelly (Gen2+), use Find devices or enter its local address, then Refresh functions. For Kasa, choose the network and Find switches, or enter an address and Check IP. Save the destination disabled, then Refresh functions.
On Producer Desk, select the item and open Actions. Choose the room’s destination, device or channel, function and value. For OSC, enter the address and argument types supplied by the equipment maker.
Leave the destination and action disabled until your venue operator has checked the settings and approved a test.
Enable them when ready. After taking the item live, check Recent results and the equipment itself.
When actions run
Once per service is the default, including blocked attempts. Choose Every Go Live only if you want that behavior. Selection, Preview and scheduled clock updates do not send actions. Multiple actions are independent; their order is not guaranteed.
Reading the result
Q-SYS, Shelly and Kasa Confirmed means the device acknowledged the command. OSC Sent means the message was sent, not that the equipment performed it. Check connection and device discovery only read information; they do not switch equipment.
If delivery fails
Failed or uncertain actions are not automatically retried after reconnection. Review the result before sending again. Changing an action on a live item is restricted.
Supported Shelly devices
Use Gen2+ Wi-Fi or Ethernet switches, plugs and lights with local switch or light controls. A cloud account or extra hub is not needed. Brightness appears when supported. Gen1, Bluetooth-only devices, color, covers and custom scripts are not included.
Room assignments matter
Destinations and actions belong to their location and room. New ones start disabled. Connect keeps device passwords in Keychain and blocks an action if the device identity changes or a function disappears.
Supported Kasa switches
HS200 and HS210 switches support Turn on and Turn off. Connect talks directly to the switch over your local network; no extra hub is needed. Authenticated switches need the TP-Link account email and password in Connect. The password stays in this Mac’s Keychain. Save changes before using Check connection or Refresh functions. Other models and protocols are not supported yet. A successful connection check does not test switching.
Connections
Schedule lights and switches
Turn room devices on and off at regular times, even when no service is running.
Steps
Add your Kasa or Shelly device in Connect and read its available functions.
Open Device schedules in Service Producer on Mac or the web. Choose the location and room.
Add a schedule, choose the device and function, then select its days, local time and time zone. Save it disabled while you review the plan.
When you are ready, turn on Allow scheduled control for that device in Connect and enable the schedule in Service Producer. Runsheet Actions have their own separate enable switch.
Keep Connect running
Connect must stay running on an awake Mac with internet access and a connection to the device. You can close Producer Desk; a service does not need to be running.
Pause a room
Use Pause room schedules to pause every schedule in that room. It does not turn devices off or change runsheet Actions. Resume applies to future scheduled times.
Check recent activity
Missed times are skipped rather than replayed after a restart or outage. Recent activity shows confirmed, failed, skipped or uncertain results. Check the device after an uncertain result; the command will not be retried automatically.
Daylight-saving changes
Times follow the time zone saved with the schedule. Daylight-saving changes keep the same local time. A time that does not exist during the spring change is skipped; a repeated time in autumn runs once.
Keep room assignments separate
Each schedule belongs to its chosen room. Changing a device’s connection or replacing it requires checking its available functions again.
Connections
Connect Planning Center and Resi
Bring in your plan and set up the video connection your team uses.
Steps
Open Settings → Connections for Planning Center and Resi.
Connect Planning Center with an account that can access the service types and plans you need.
For Resi cues and playback, connect Resi Studio. The Resi API connection is separate and does not replace Studio access.
For a decoder, authorize the updated Connect app for the location / room. Open Resi decoder, enter its private IP address and save with control disabled. The address stays on that Mac.
In Producer Desk → Stream → Broadcast setup, choose the Resi location, recording, broadcast item and first/last cues. Select your Connect device under Playback device. Use Refresh devices if you just configured it.
Confirm the recording for each service, then save. The room remembers its decoder and cue defaults. Saving does not start playback.
Keep Connect running on the decoder network. Enable Play/Pause control there only when you are ready to test the hardware.
Plan will not load?
Check the Planning Center connection, plan permissions, service type and time. Keep the current service in place until the new plan loads.
Monitoring and rehearsal
The updated Connect app replaces the separate decoder bridge. Browser rehearsal still runs separately from the live service. Monitoring reads Resi Studio; a local decoder connection is needed only for Play/Pause.
If a connection drops
Connect reconnects automatically. Its Reconnect button refreshes the cloud connection without playing or pausing the decoder. If Studio needs sign-in, reconnect in Settings → Connections. Old playback commands are not replayed.
Check the real output
Sent means the command was written to the connection, not that playback was confirmed. If delivery is uncertain, inspect the decoder before trying again. Timing is an estimate; stale reports blank the countdown. Hardware validation is required before live use.
Other control systems
Existing command-line decoder bridges still work. Companion and RossTalk setup remains in the External controls guide.
Review your plan, renewal or cancellation in Settings → Billing.
Annual plans
US$199 per organization covers 1–3 active rooms each year. US$299 covers 4 or more. Applicable tax is additional. Archived rooms do not count.
Creating an organization
Public paid signup is not open yet. When available, verify the owner’s email and complete secure checkout to activate the organization. Existing organizations are not automatically moved to a paid plan.
Cancel a renewal
The organization owner can manage billing in Settings → Billing. Cancellation stops the next renewal, with access continuing through the paid term.
Refunds
Your first annual purchase has a 14-day refund window. Renewal payments do not receive prorated refunds, except where required by law. Use the support contact form to request a refund.
Change plans
An upgrade shows the amount due before you confirm. A downgrade takes effect at renewal; the organization must fit the lower plan’s active-room limit.
If paid access expires
Starting new services is blocked, but a service already running can finish. Billing remains available. The published Terms of Use and checkout terms apply to your purchase.
Start with the symptom you can see. Keep saved pairings in place while you check.
A linked video will not play
Check the room in Connect and Producer Desk, the open Playback Event and the cue’s media. Then check transport permission and Outputs Armed in Playback. Read the last command result before trying again.
Auto has not moved to the next service
Check the location, selected service types and schedule. If the previous service is finished, use End service. A controller or uncertain Playback status may be keeping it active.
A screen is delayed or disconnected
Check its status in Devices and its network connection. Keep the screen awake. A retained picture does not prove it is connected. Reload between services if needed; avoid forgetting the pairing.
The layout looks different on a screen
Check its assigned layout, room default and any display-specific settings. Save your edits and look for a missing-font warning. A fallback font can change the text’s shape and spacing.
The app is blank or a page will not load
Check the connection and sign-in, then use Reload or Try again if offered. Save or discard any draft before restarting. Restarting the Mac output app interrupts its local pictures.
Still need help?
Use Contact support. Include your app version, device, room, service date and time, what you tried, and the exact error. A screenshot helps. Never send passwords, pairing invitations or connection files.